Maybe you started out playing games on consoles before jumping into PC gaming, or maybe you just don’t like lifting your finger to change from forward to backward movement with a keyboard. Whatever the reason may be, using a keyboard for character movement just might not feel as natural or as comfortable as using a controller’s analog stick. At the same time, it may also feel more natural and comfortable to aim with a mouse rather than with an analog stick. Unfortunately, this hybrid control scheme is not one that most games are willing to accommodate. So how do you get the best of both worlds?
On the console side, this setup is possible with devices such as the XIM4, which allow for analog movement via a Playstation Navigation Controller (“PS Nav Controller” hereafter) while aiming with a mouse at the same time. Paired with a wireless mouse with thumb shortcuts and a mouse pad on a lap desk, I found this to be a comfortable couch-gaming setup, and ever since, I’ve wanted a similar setup for PC games. Since PC games are already configured perfectly for mouse input, it wouldn’t rely on the XIM4’s calibration profiles, not to mention the enhanced graphical configuration possible with PC games. But how do you set it up?
I was excited to learn that such a configuration could be achieved in games that allowed simultaneous controller and keyboard/mouse (KB/M) input, as long as you install ScpToolkit drivers for your PS Nav Controller in advance. The first PC game I tried with the PS Nav Controller was Overwatch, and it worked well, despite some flickering button prompts. It was a good enough setup for that game, but I soon realized that the majority of PC games don’t allow for simultaneous controller and KB/M input. In addition to flickering button prompts, using a controller to move your character often renders you unable to move the camera with the mouse at the same time, requiring you to stop moving in order to look around. It soon became discouraging enough that I gave up on the idea, until one day I realized that Steam’s controller configuration options allowed for an experience on par with the XIM4, as long as you played your games on Steam.
However, many of my PC games are from other marketplaces, such as the Microsoft Store, Xbox Game Pass, the Epic Games Store, GOG Galaxy, and so on. Adding such games and/or their marketplace launchers to Steam didn’t always let me configure their controls in Steam’s Big Picture Mode, and I didn’t have much luck with middleman software such as GloSC, which prefers games to run in borderless windowed mode in order to alt-tab to Steam’s controller configuration. So what was I to do? Re-buying all my non-Steam games on Steam wasn’t an acceptable solution, and I didn’t want to be tethered to Steam for all my PC gaming in the first place. When it came down to it, I just wanted a way to use my PS Nav Controller as a keyboard input, and have it go undetected as any kind of controller at all. That way, I could use it with any game that supports KB/M controls, which is nearly every PC game. Luckily, through a brief mention on a Steam forum, I was able to piece together what I needed to make it happen. I’m sure many others have made the same discovery, but to my knowledge, there isn’t any comprehensive guide to help people in just this situation, so I thought I’d make one and save someone the frustration I went through.
These are the benefits you’ll gain from following this guide:
- You’ll be able to use your PS Nav Controller and mouse simultaneously with any game that supports keyboard and mouse controls, even if the game lacks controller support.
- For games that support both controller and KB/M input, but not a simultaneous mixture, you’ll no longer see rapidly changing button prompts based on detected input, since you’ll be operating fully in KB/M mode. This also allows you to control camera movement with the mouse while moving your character with the PS Nav Controller.
- You’ll no longer have to rely on Steam’s controller configuration support, so you can enjoy your configured controls wherever games are cheapest or most convenient for you, including the Epic Games Store, Xbox Game Pass, Twitch, GOG Galaxy, etc, without needing to launch non-Steam games through Steam or run games in borderless windowed mode to work with alt-tab and GloSC.
- And last but not least, you won’t have to deal with the train wreck that is the MotionInJoy software.
As for compromises you’ll need to be aware of, if a game doesn’t support simultaneous controller and KB/M input, analog directional input will need to be sacrificed in favor of 8-way directional input (i.e. WASD) in order for you to stay fully in KB/M mode without triggering a game’s controller support. On the other hand, if your game supports simultaneous controller and KB/M input (like Overwatch), and you don’t mind rapidly changing button prompts, you can make an XInput profile instead of a KB/M profile and retain analog directional input. I’ll include directions for doing so in Step 7 of this guide.
Before we begin, here’s a list of software and hardware you’ll need in order to follow along.
For software, you’ll need a copy of Better DS3 1.5.3, MotionInJoy 0.7.1001 drivers, and optionally ScpToolkit 1.6.238.16010 if you want to use your PS Nav Controller over a wired connection. For convenience’s sake, you can download everything you’ll need from this download link. The reason for needing ScpToolkit for wired connections is that without them, a wired PS Nav Controller doesn’t show up in Device Manager (at least for me), and it needs to show up in Device Manager in order to overwrite its drivers with the MotionInJoy driver. Also note that we aren’t installing the MotionInJoy software itself, only its drivers, so don’t worry. Anyone who has attempted to use MotionInJoy’s software likely knows what a disaster it is, so we’ll avoid that experience altogether.
For hardware, you’ll need a Playstation Navigation Controller, a USB Bluetooth receiver specifically for connecting your PS Nav Controller wirelessly, and a USB Type A to Mini B cable if you’d like to use a wired connection to your PC.
Below are the general steps in this guide, which I’ve only confirmed working on Windows 10. If you’re starting with ScpToolkit already installed for your USB Bluetooth receiver, start at Step 1. Otherwise, proceed from Step 2. If you only plan to use your PS Nav Controller over a wired connection, you can skip over Step 3, and if you only plan to use your PS Nav Controller over Bluetooth, you can skip over Steps 4 and 5, but otherwise it’s recommended to follow all steps.
- Uninstall Existing ScpToolkit USB Bluetooth Receiver Drivers
- Disable Signed Driver Enforcement
- Install the MotionInJoy Driver for Your USB Bluetooth Receiver
- Install the ScpToolkit Driver for Your Wired PS Nav Controller
4b. Replace ScpToolkit’s Wired Driver with the MotionInJoy Driver - Uninstall ScpToolkit
- Create a Keyboard/Mouse Profile in Better DS3
- Create an XInput Profile in Better DS3
Alright, let’s get started!
Step 1: Uninstall Existing ScpToolkit USB Bluetooth Receiver Drivers
If you’re like me, you may have already been using ScpToolkit to connect your PS Nav Controller to your PC, and then configuring your controls via Steam. If you’re fine with playing all your games through Steam, you don’t necessarily need to follow this guide, but if you’d like to have a universal configuration method that isn’t at Steam’s mercy, don’t hesitate to follow along.
First, open Device Manager. You can find a link to it in Windows’ Control Panel, or simply press the Windows Key on your keyboard and type “Device Manager” to find it.
If you already have your PS Nav Controller powered on and connected to your PC, you can skip this paragraph, but I’m including it so that anyone can uninstall their existing ScpToolkit driver regardless of their controller’s connection state. With Device Manager open, click View in the toolbar, and then Show hidden devices.

Find your USB Bluetooth receiver listed under libusbK USB Devices. In my case, my receiver is called Generic Bluetooth Radio. You may also notice ScpToolkit’s wired driver, seen here under libusb-win32 devices as Navigation Controller. We’ll overwrite the wired driver in Step 4b, but don’t skip ahead since we’ll need to complete Step 2 first.

Right click Generic Bluetooth Radio or its equivalent, and choose Uninstall device.

You’ll then see the following prompt that warns “You are about to uninstall this device from your system.” Click the Uninstall button to complete the process.

Step 2: Disable Signed Driver Enforcement
Since the MotionInJoy drivers aren’t digitally signed, you’ll need to disable Windows’ Signed Driver Enforcement in order to successfully install them, so let’s do that now.
- Click the Start menu (or press the Windows Key on your keyboard) and open the Settings app.
- In Settings, click on Update and Security.
- Click Recovery.
- Under Advanced Startup, click Restart now.
- Click Troubleshoot.
- Click Advanced options.
- Click Startup Settings.
- Choose Restart.
- On the Startup Settings screen, press 7 (or F7) to Disable Driver Signature Enforcement.
Once your PC reboots, you’ll be able to install MotionInJoy’s unsigned drivers. Signed Driver Enforcement is re-enabled automatically after a power cycle, so be sure to complete either Step 3 or Step 4 of this guide before you power down your PC. Once the MotionInJoy drivers are installed once, they can be installed again for other devices at any time, so only one installation is required if you can’t complete both Steps 3 and 4 during this power cycle (e.g. if you’re waiting on your USB Bluetooth receiver to arrive in the mail, or you have a USB Bluetooth receiver but don’t need a wired connection right now, etc).
Step 3: Install the MotionInJoy Driver for Your USB Bluetooth Receiver
Important note: Installing the MotionInJoy drivers for your Bluetooth receiver will give your PS Nav Controller exclusive access to that receiver, so I wouldn’t recommend using your motherboard’s built-in Bluetooth receiver unless you don’t plan on connecting any other Bluetooth devices to it. In other words, use a Bluetooth receiver that you don’t mind dedicating specifically to your PS Nav Controller.
Open up Device Manager in Windows’ Control Panel, or press the Windows Key on your keyboard and type “Device Manager”.
Make sure your USB Bluetooth receiver is plugged in to your PC, and confirm that it shows up in the Bluetooth section of Device Manager.

Right click the USB Bluetooth receiver you’d like to pair exclusively with your PS Nav Controller, and choose “Update driver”.

In the window that appears, choose “Browse my computer for driver software”.

In the next window, click the Browse… button and select the directory that contains your MotionInJoy drivers (not my directory shown in the image), and copy that directory from the text box. I’ve personally had no luck continuing via the Next button, so once you have your driver location copied, instead choose Let me pick from a list of available drivers on my computer.

In the next window, click the “Have Disk…” button. You may notice that in my screenshot I have the “MotioninJoy Virtual Xinput device for Windows” option available since I’ve already installed it once, but it probably won’t show up for you just yet if you’re following this guide step-by-step, so just click the “Have Disk…” button.

In the Install From Disk window, paste the MotionInJoy driver directory you copied earlier into the box labeled “Copy manufacturer’s files from:”, and click the OK button.

You should now see the “MotioninJoy Virtual Xinput device for Windows” option in the Model box. With the MotioninJoy option selected, click the Next button.

If everything went well, you should see the following window informing you of the success of the MotioninJoy driver installation.

Note: You might have to install the MotionInJoy driver for each unique USB port you plug your bluetooth receiver into. I had to on my PC at least. If anyone knows a way around this, please leave a comment.
Step 4: Install the ScpToolkit Driver for Your Wired PS Nav Controller
If you have a USB Bluetooth receiver, make sure it’s unplugged from your PC before beginning this step. Then, plug your PS Nav Controller directly into your PC via a USB cable.
Open Device Manager in Windows’ Control Panel, or press the Windows Key on your keyboard and type “Device Manager”.
If at this point you can see your PS Nav Controller in the Device Manager window, feel free to skip to Step 4b. However, if your PC is like mine, you’ll need to install another driver first in order to see your wired PS Nav Controller in Device Manager. Sure, you could try installing the driver directly with MotionInJoy, but since that software is an absolute nightmare, I’d rather avoid it however possible.
Run the ScpToolkit 1.6.238.16010 installer. While there are newer versions of ScpToolkit available, this specific version is known to work well with PS Nav Controllers, so it’s what I recommend.
Agree to the license terms and conditions, and click Next.

On the next screen, you can leave the “features to be installed” at their defaults, and click the Install button.

Once that finishes, click Run Driver Installer.

On the left side of the next window, uncheck everything you can except Install Dualshock 3 driver. If you’ve connected your PS Nav Controller to your PC via USB cable as instructed earlier, you should see Navigation Controller show up as an option on the right side under “Choose DualShock 3 controllers to install”. Make sure your Navigation Controller has a check in its checkbox, and click the Install button.

Once the installation process finishes, close the ScpToolkit installer, but don’t delete it. We’ll run it again in Step 5 to uninstall ScpToolkit.
Step 4b: Replace ScpToolkit’s Wired Driver with the MotionInJoy Driver
You should now see your Navigation Controller in the Device Manager window. If you installed the ScpToolkit driver, it will show up under libusbK USB Devices. Right click on Navigation Controller, and choose Update driver.

In the next window, choose Browse my computer for driver software.

If you skipped Step 3, start from the above image in the Step 3 section and finish Step 3 before proceeding to Step 5.
If you’ve already completed Step 3, you should be able to simply choose MotioninJoy Virtual Xinput device for Windows from the Model box and click the Next button.

If everything went well, you should see the following window informing you of the success of the MotioninJoy driver installation.

Note: You might have to install the MotionInJoy driver for each unique USB port you plug your PS Nav Controller into. I had to on my PC at least. If anyone knows a way around this, please leave a comment.
Step 5: Uninstall ScpToolkit
If you were able to install the MotionInJoy drivers without ever installing ScpToolkit, you can skip to Step 6. Otherwise, I would recommend uninstalling ScpToolkit since it may cause conflicts when using other USB ports, and it’s unnecessary at the very least. Better DS3 can adequately handle both PS Navigation and Dualshock 3 controllers, and there is better software available for Dualshock 4 controllers as well (such as DS4Windows). If you’d rather leave ScpToolkit installed anyway, feel free to skip to Step 6, but I may not have any helpful troubleshooting info if you encounter problems with such a setup.
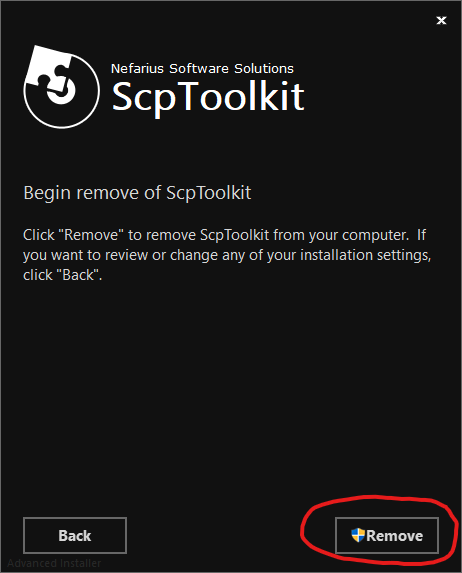
With that disclaimer out of the way, run the ScpToolkit installer, and select Remove.

On the next screen, click the Remove button in the lower right.

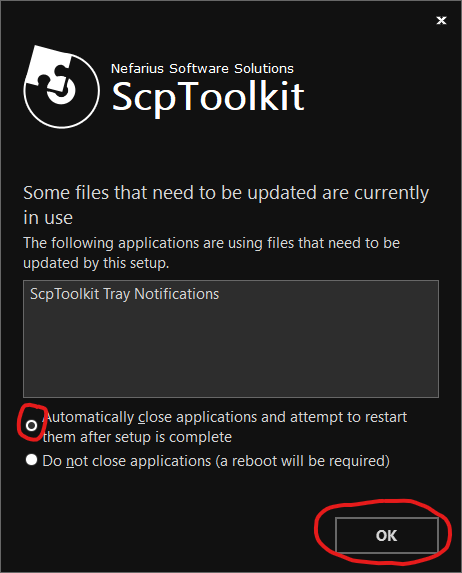
If you have ScpToolkit running in your Windows system tray, you may see the following screen. In such a case, simply select the “Automatically close applications and attempt to restart them after setup is complete” radio button and click the OK button in the lower right.

If the uninstallation is successful, you’ll see the following screen.

Step 6: Create a Keyboard/Mouse Profile in Better DS3
Make sure that your PS Nav Controller is connected to your PC via either Bluetooth receiver or USB cable, and open Better DS3. Your controller should be visible in Better DS3’s left-hand pane. If you have multiple devices show up in the left-hand pane despite only having one controller connected, or have no visible devices, especially right after uninstalling ScpToolkit, try restarting your PC.
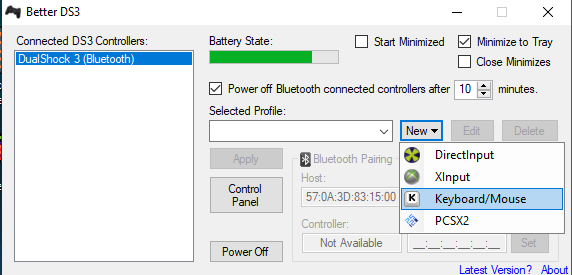
Once your PS Nav Controller shows up in Better DS3, create a game profile by clicking the New button highlighted below.

Then, choose Keyboard/Mouse from the dropdown menu.

Give your profile a name based on what game your configuration is going to be for.

In this example, I’m creating a profile for Gears of War 5, a game that I wanted to play with a PS Nav Controller on Xbox Game Pass but couldn’t, which led me to this solution.
After entering a name for your profile, change the Controller Template from DualShock 3 / SixAxis to Move Navigator.

When you select Move Navigator as your controller template, you’ll see the buttons available for configuration change to those found on the PS Navigation Controller.

Configure your buttons to keyboard inputs rather than controller inputs, and then drag the scroll bar down. If you try to scroll with your mouse wheel instead, you may accidentally change a selected button’s configuration, so be careful.

Once you scroll down, you’ll see the Left Stick configuration for the PS Nav Controller’s analog stick. Again, rather than setting these to controller inputs such as the corresponding axes, set them to keyboard inputs. D, A, S, W or Arrow Right, Arrow Left, Arrow Down, Arrow Up should suit most people’s needs. If you’d like to assign a key to the left analog click (L3), be sure to do that as well.

Once you’ve got all the buttons configured the way you want for that game’s profile, click the Save Profile button.

Once you’re back at the main Better DS3 window, select the profile you just created under Selected Profile, and click the Apply button.

Now let’s test for (lack of) controller input. If you click Better DS3’s Control Panel button, you’ll be taken to Windows’ Game Controllers configuration, where you should see your PS Nav Controller listed as MotioninJoy Virtual Game Controller. From here, click the Properties button.

With the Properties window open, try moving the PS Nav Controller’s analog stick and pressing some buttons. If all went well, you should see no inputs registering, because your PS Nav Controller is now operating under the radar as a keyboard. Congratulations, you can now play any PC game you want with your PS Nav Controller!

Step 7: Create an XInput Profile in Better DS3
For games like Overwatch that handle simultaneous controller and mouse input fairly well, you may want to create a traditional controller profile and have your PS Nav Controller act as such, which enables analog directional movement. This is effectively what ScpToolkit did, and we can do the same thing with Better DS3.
In Better DS3’s main window, create a new controller profile by choosing New > XInput.

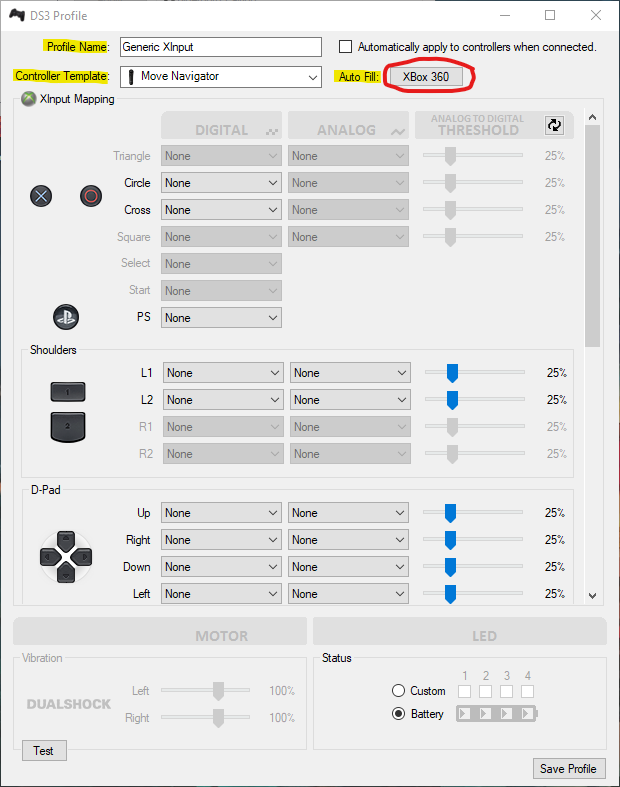
Like we did in Step 6, give your profile a name, and choose Move Navigator as your Controller Template. Now, click the XBox 360 button in the Auto Fill section at the top of the window.

Once you do that, the top half of your configuration window should look like the following. If it does, click the scroll bar and drag down to view the bottom half of the configuration. Again, be careful about using your mouse’s scroll wheel to scroll, as it can potentially change the button configuration for a dropdown menu you may have inadvertently selected.

Confirm that the bottom half of your configuration looks like the screenshot, and click the Save Profile button.

With your XInput profile selected in the main Better DS3 window, click the Apply button, then the Control Panel button.

Your PS Nav Controller should now be detected as an Xbox 360 Wireless Receiver for Windows instead of a MotioninJoy Virtual Game Controller. To make sure everything is working, click the Properties button.

Test the inputs on your PS Nav Controller, and you should see the button presses light up, as well as more precise movement in the Axes box. As you can see highlighted in the screenshot, I’m moving my analog stick crosshair somewhere between the south and southeast directions, which wouldn’t be possible with 8-way directional input.

If everything checks out okay, congratulations! You can now use your PS Nav Controller for precise analog movement in games with hybrid controller/mouse support.
Thanks for reading, and happy gaming!


